
I’ve been addicted to boutique hair bows since I was pregnant with Riley. The moment I found out I was having a little girl I knew hair bows were going to be an absolute MUST. Instead of spending crazy amounts of 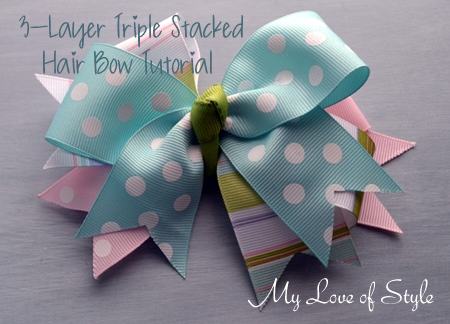 money on boutique hair bows I decided to invest in ribbon of various colors, sizes and prints that way I can make customized boutique hair bows to match every outfit in Riley’s closet. I’m excited to show you how to make one of my favorite boutique hair bows, The 3-Layer Stacked Boutique Hair Bow. This is such a fun hair bow, it creates a big impact without being too busy.
So if you’re looking for a quick and easy boutique hair bow tutorial this is a Must-try hair bow DIY . You can make this stacked boutique hair bow in about 15 minutes…quick and easy something all moms can appreciate!! 🙂
Okay, here is what you will need:
- 3, 17 inch long pieces of 1-1/2 inch wide Ribbon (use three different patterns for a bigger impact)
- 7 inch long piece of 7/8 inch wide ribbon
- Scissors
- Fray Check or Lighter (to singe the edges)
- Hair Clip
- Floral Wire or Jewelry Wire
- Hot Glue Gun

Step 1: Take one piece of 17″ long ribbon and overlap as shown below.

Step 2: Pinch the center of the ribbon (it will fold accordion style)

Step 3: Take a piece of floral wire or jewelry wire and wrap it around the center and twist it so it will stay in place
Step 4: Once your bow is secured with floral or jewelry wire you will want to finish your ends. I used a “V-Cut” Finish. To get a V-cut you will fold the ends of the ribbon in half length-wise. Then Cut
the ribbon at an angle. When you open the fold you will have a V-cut.

Seal the ends of your ribbon with either a lighter or fray check. This keeps the ribbon from fraying.
Step 5: Repeat Steps 1 – 4 for the remaining 17″ pieces of ribbon. Your bows should look like this when you finish.

Step 6: Add a little dot of hot glue onto the top of the bow you want on the bottom. Then place the bow you want in the middle on top of it (slightly clockwise to the bottom bow)

Step 7: Add a dot of hot glue on the middle bow and place the top bow on top of it (slightly clockwise to the middle bow)

After you’ve adhered all three bows you will need to make your center knot
Step 8: To make your center knot take your 7 inch piece of 7/8 inch ribbon and fold it over (like an awareness ribbon) the top piece will then go up through the center and gently pull to make a loose knot.

Step 9: Glue the knot around the center of your stacked bows

Step 10: Glue your clip onto the back of the bow

When you’re finished you’ll have a Beautiful 3-layer Triple Stacked Bow!


Here are some pictures of Rily Roo wearing her New 3 Layer Stacked Boutique Hair Bow 🙂

Riley loves her accessories. She couldn’t decide what hat she wanted to wear she she decided to carry them both around and switch back and forth between the two 🙂


* I want to thank Offray for the sponsored collaboration
Until Next Time….
Hi – Can you add me to your email list. I tried but it said not accepting. Thank you.
Donna