
I am so excited to FINALLY share my DIY Stair Makeover, as this project has literally been on my to-do list for over 3 years. Before I get started I want to share some of the background info on this long awaited home renovation.
It all started a little over 3 years ago (in preparation for Riley’s arrival) we decided to get rid of the carpet on the stairs, bedrooms and upstairs hallway. The plan was to put down laminate flooring in the bedrooms and hallway and refinish the stair treads. At the time I was 7 1/2 months pregnant so, me helping wasn’t an option, I could barely bend over without doing a tumbling over, so I knew a home renovation project of this capacity was def out of the question.
So, I sat this one out, but in case you’re wondering how it went, I’ll put it to you this way…”If you want something done right, or done at all, you have to do it yourself.” Long story short only two of the 4 rooms ended up with new flooring and the stairs…..Wellllll they became a construction zone. My husband ripped up the carpet the night before they were going to get started on installing the flooring, but they never got around to the stairs so they were a hot mess to say the least.
So after walking up and down a set of unfinished stairs for 3 years I couldn’t take it anymore. While I didn’t have any sort of knowledge in flooring or a clue as to where or how to begin I knew I could figure it out. Like they always say, If there is a will there is a way.
So I thought through what I needed to do, did some research, put a plan in place and recruited my awesome dad to help…now it was time to get started.
This was a pretty big project, so I decided to share it in two parts.
Stair Makeover Part 1 includes the steps to take in order to Prep Your Stairs, from the moment you pull up the carpet until time to paint.
Stair Makeover Part 2 is everything that goes into painting and sealing your stairs.
I don’t have pictures showing how to pull up the carpet since that was done 3 years ago, so I’m going to start with what to do once you get the carpet up.
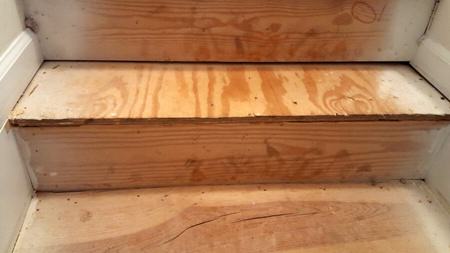
Below are some pictures of my steps after the carpet was removed. I can’t believe I actually went up and down these stairs for 3 years…..

This is the view looking up the steps from the top landing

This is an up-close view of the last step where they used plywood instead of a stair tread.

This is looking up from the bottom of the stairs. Look how bad the riser was on the first stair landing. It had two huge holes.

So, that’s the last of the before pics….Now it’s time to get this DIY Party started!!!
Here are a few things you’ll need:
- Pliers (for removing staples)
- Flat Head Screw Driver (to help pry the staples out so you can grab them with the pliers)
- Palm Sander
- 120 Grit Sandpaper
- Plastic Wood Filler (I found it works best when sanding a large area)
- Putty Knife
- Plastic Drop Cloths (to close off the area you are going to be sanding)
- Mineral Spirits OR Vinegar and Water Mixture (to remove all of the dust)
- Caulk
Step 1: Remove all of the staples (there were more than a hundred in my stair treads, the majority were under the stair noses. I used a flat head screw driver to lift the staple then I pulled them out using pliers.

Step 2: Scrape off any carpet glue or construction adhesive. I used a steam iron to heat the adhesive (this softens the adhesive so you can scrape it off). Once it’s soft, use a putty knife to gently remove the adhesive.


Step 3: Sand the excess paint off the stairs (I don’t think this is something that you typically see when you remove your carpet) so if this doesn’t apply to you, then consider yourself lucky and move on to the next step!:-)
If you, like me, have a set of half way painted steps when you pull the carpet up then you’ll need to take this extra step and sand off all of the paint. I used a palm sander 


The edges were difficult to get to so I ended up sanding those by hand.

A few things I want to mention before you get started sanding
- Make sure you wear a breathable dust mask (this minimizes the amount of dust you breathe in).
- I highly recommend closing the area off. I did this by creating a tent using plastic drop cloths over and around the area that I was going to be sanding (I didn’t do this the first time I sanded the stairs, but I def. took the time to do it the second time). I’ll show you a picture of what mine looked like shortly.
- Use a palm sander with a dust bag (it catches the majority of the dust) and makes cleanup SO much easier, not to mention it makes a huge difference in the way you feel. You may not realize it but you are breathing in all of the dust particles that are being released into the air
- If you have expensive air filters switch them out with cheap air filters that way the dust particles get captured in the cheap filter. When you’re finished sanding throw the cheap filters out and replace them with your good air filters. I found this out the hard way. After spending 3 days sanding and re-sanding the steps (after filing the areas with plastic wood filler) our air filters were so full that our brand new A/C was struggling to the point that we thought it was broken. :-/
Alright, once you’ve finished sanding you need to thoroughly wipe down your stair treads and risers before moving on to Step 4.
Step 4: Use wood filler to fill in any cracks, scuffs, dents or uneven areas on the stair treads and landings. From my experience I found that Plastic Wood Filler

Step 5: Prepare your area for sanding….Hang Plastic Drop cloths around the area surrounding the stairs. This is the part I forgot to do the first time I sanded down the stairs, but you better believe I didn’t forget to do it the second time. Here are a few pictures of my drop cloth fort….and a few of Riley playing in it (before we started the sanding process). She thought I made it just for her to play in. Trying to get her out of her “fort” so we could get to work was more difficult than making it.


Step 6: Sand the excess wood filler off of the steps. This process literally took me 3 days because there were so many horrific imperfections on the stair treads and landings.

Step 7: Vacuum the entire staircase clean of all sanding dust. Then wipe down all surfaces using a microfiber cloth and either mineral spirits or a vinegar and water mixture. By doing that you’re able to capture a lot of the leftover dust that would have otherwise been difficult to clean up.

Step 8: Replace the plywood tread with an actual stair tread. This will most likely not apply to you, so if you have stair treads on all of your stairs then you are all set and can skip this step.
To remove the plywood we had to use a jigsaw because the plywood actually went underneath the top step all the way to the wall. So we had to remove the moulding on both sides using a pry bar and then cut the plywood with a jigsaw. I’m super mad at myself for not taking a picture of what the step looked like after we removed the plywood, so I’m sorry I am unable to show you that portion.
Here is a picture of the wall after removing the moulding

Once we had the plywood off we cut the new stair tread and installed it with liquid nails. You have to let it dry for 24 hours before it sets, but let me say, that stair tread is just as sturdy now as it would have been if we used construction nails.
Step 9: Re-install the moulding using liquid nails

Apply Liquid nails to the back of the moulding

Replace the moulding and put pressure on it to keep it in place for about 2 minutes
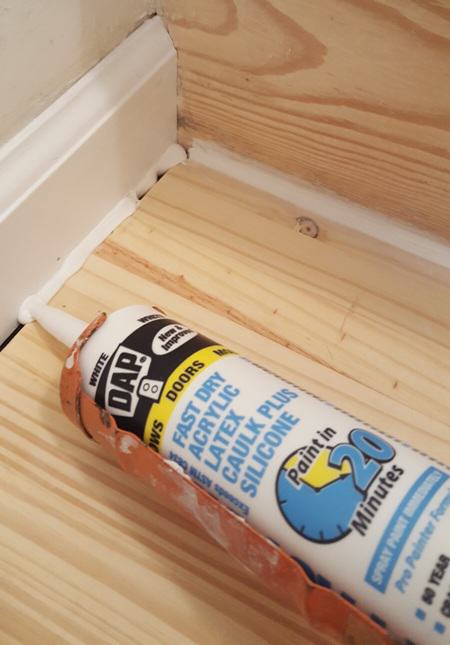
Step 10: Caulk all of the edges where two pieces of wood and/or moulding come together. Let me say this, I am horrific at caulking and it drives me absolutely insane that I can’t caulk a perfect straight, even line. As a perfectionist you not only want something to look perfect, but you want to feel confident in what you’re doing, so I practiced and practiced and practiced and finally came to the realization that I am not, and never will be a professional caulker. 🙁
I included pictures of the caulking process so you can see step by step how to do it.

Apply caulk in the crack between the wall and the tread

Smooth the caulk by wrapping a wet paper towel around your finger and running it over the caulk line very gently (if you apply too much pressure you’ll remove too much caulk)

This is what it looks like once you’ve smoothed out your caulk line
Once you’ve caulked all of your cracks and edges you’re officially finished with the prepping stage. Here are some photos of my stairs after I finished prepping them.


Look for Part 2 of my DIY Stair Makeover to follow. Part 2 will take you through the painting and sealing stage and will include the final reveal of my DIY Stair Makeover!
Until Next Time……
I can relate to your story on so many levels ;). Just last week I had had enough on my stairs and ripped up the carpeting. Lucky for me, the stairs had been carpeted before so I had 3,579,397 staples to remove – or at least a number that was twice as many as I anticipated. :(. I was just about to sand them so your post came at the perfect time! I didn’t think of making a tent with the plastic or cal hanging out the air filters. Great ideas :). Thank you! Also, thanks for being honest about the time every step takes. I was beginning to think I was a total whimp compared to everyone else even though my body is screaming at me…. Cannot wait to sand and be ready for your next post 🙂
Hi Moriah, thank you so much for your comment, I’m so glad you saw my post because let me just say I’ve tackled Alot of projects and this one was by far the most time consuming and the one I learned the most from. I think my perfectionist tendencies played a big part in why it took so long. I’ll also add that I did about 65% of the work by myself, so that definitely made it much more time consuming, but hang in there, there is definitely a light at the end of the tunnel! Are you planning to stain your stairs or paint them? I actually painted mine and then used a stain over the paint. It sounds strange but it actually turned out nice! I hope to post part 2 in a few days:-) Good Luck on your stairs! It will be well worth your time and the stress that goes with it when you’re finished!:-)